


Building a drop-down list in a report row in Oracle APEX
How I Built an 'Action' APEX Button Inside Any Report Column


Did you miss me? HELLO EVERYONE! 👋 Today, I will show you some of my most powerful tips in Oracle APEX that will enhance UX/UI and application flow. Implementing these tips will earn you some points with your PMs.
So, let's get started 🚀
Objective: trigger a custom event through a list (shared components>lists) inside the page, which will do some action.
Native list configuration
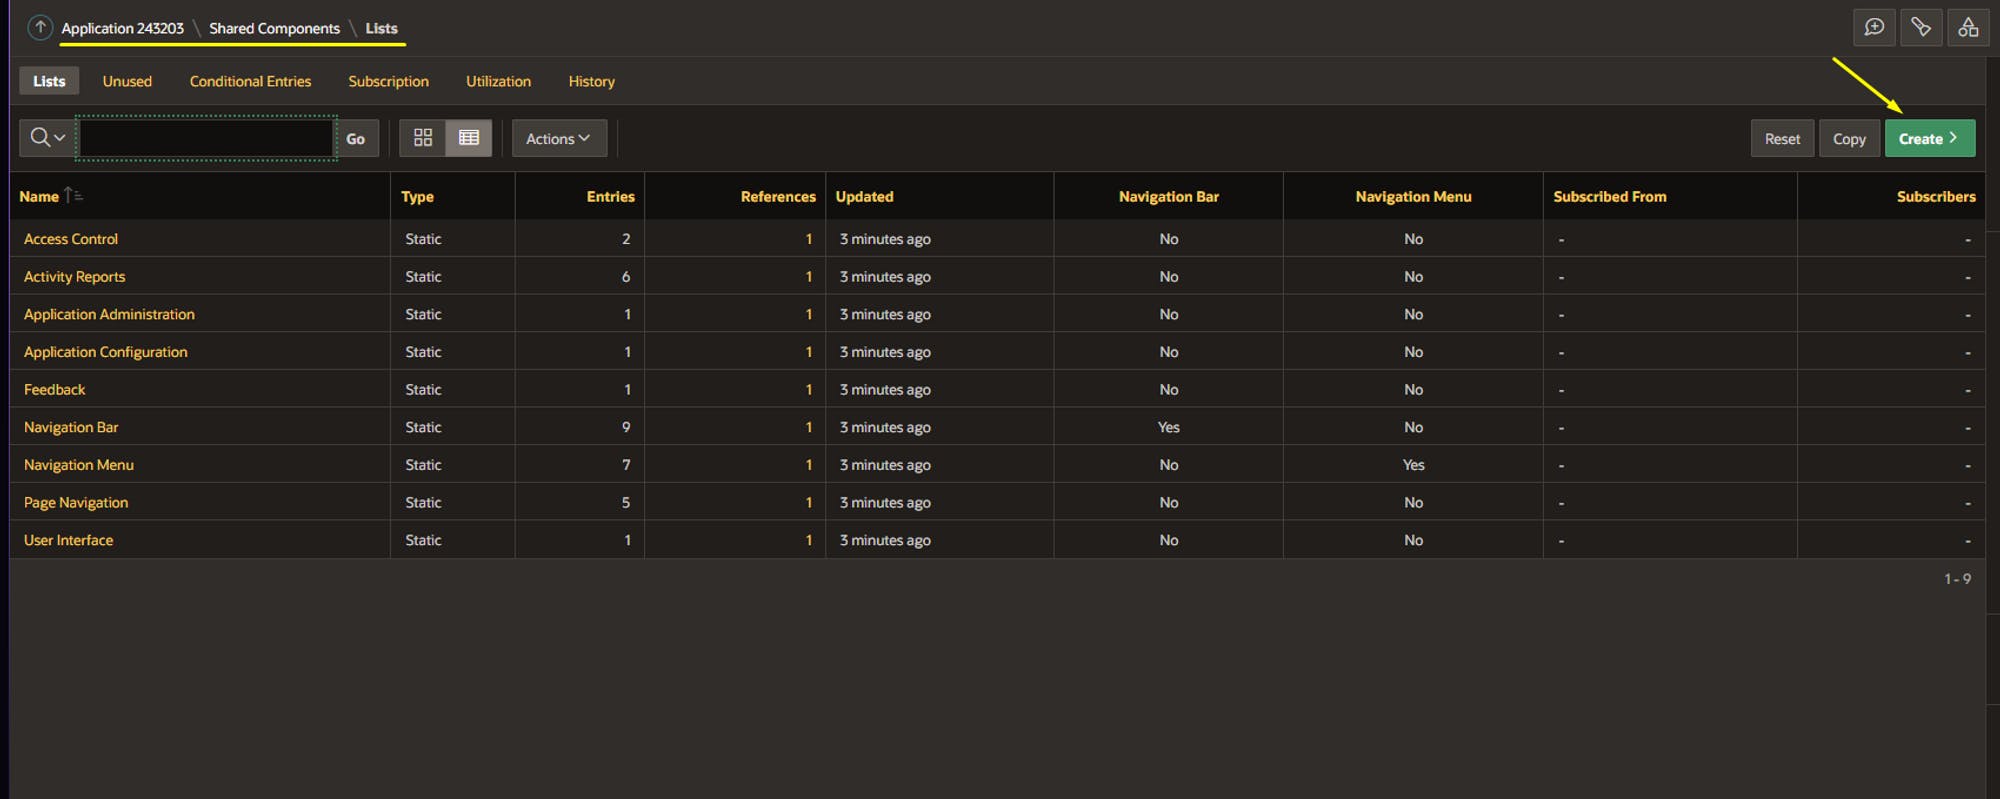
- Create a new list by navigating to your application Shared Components > Lists > Create button
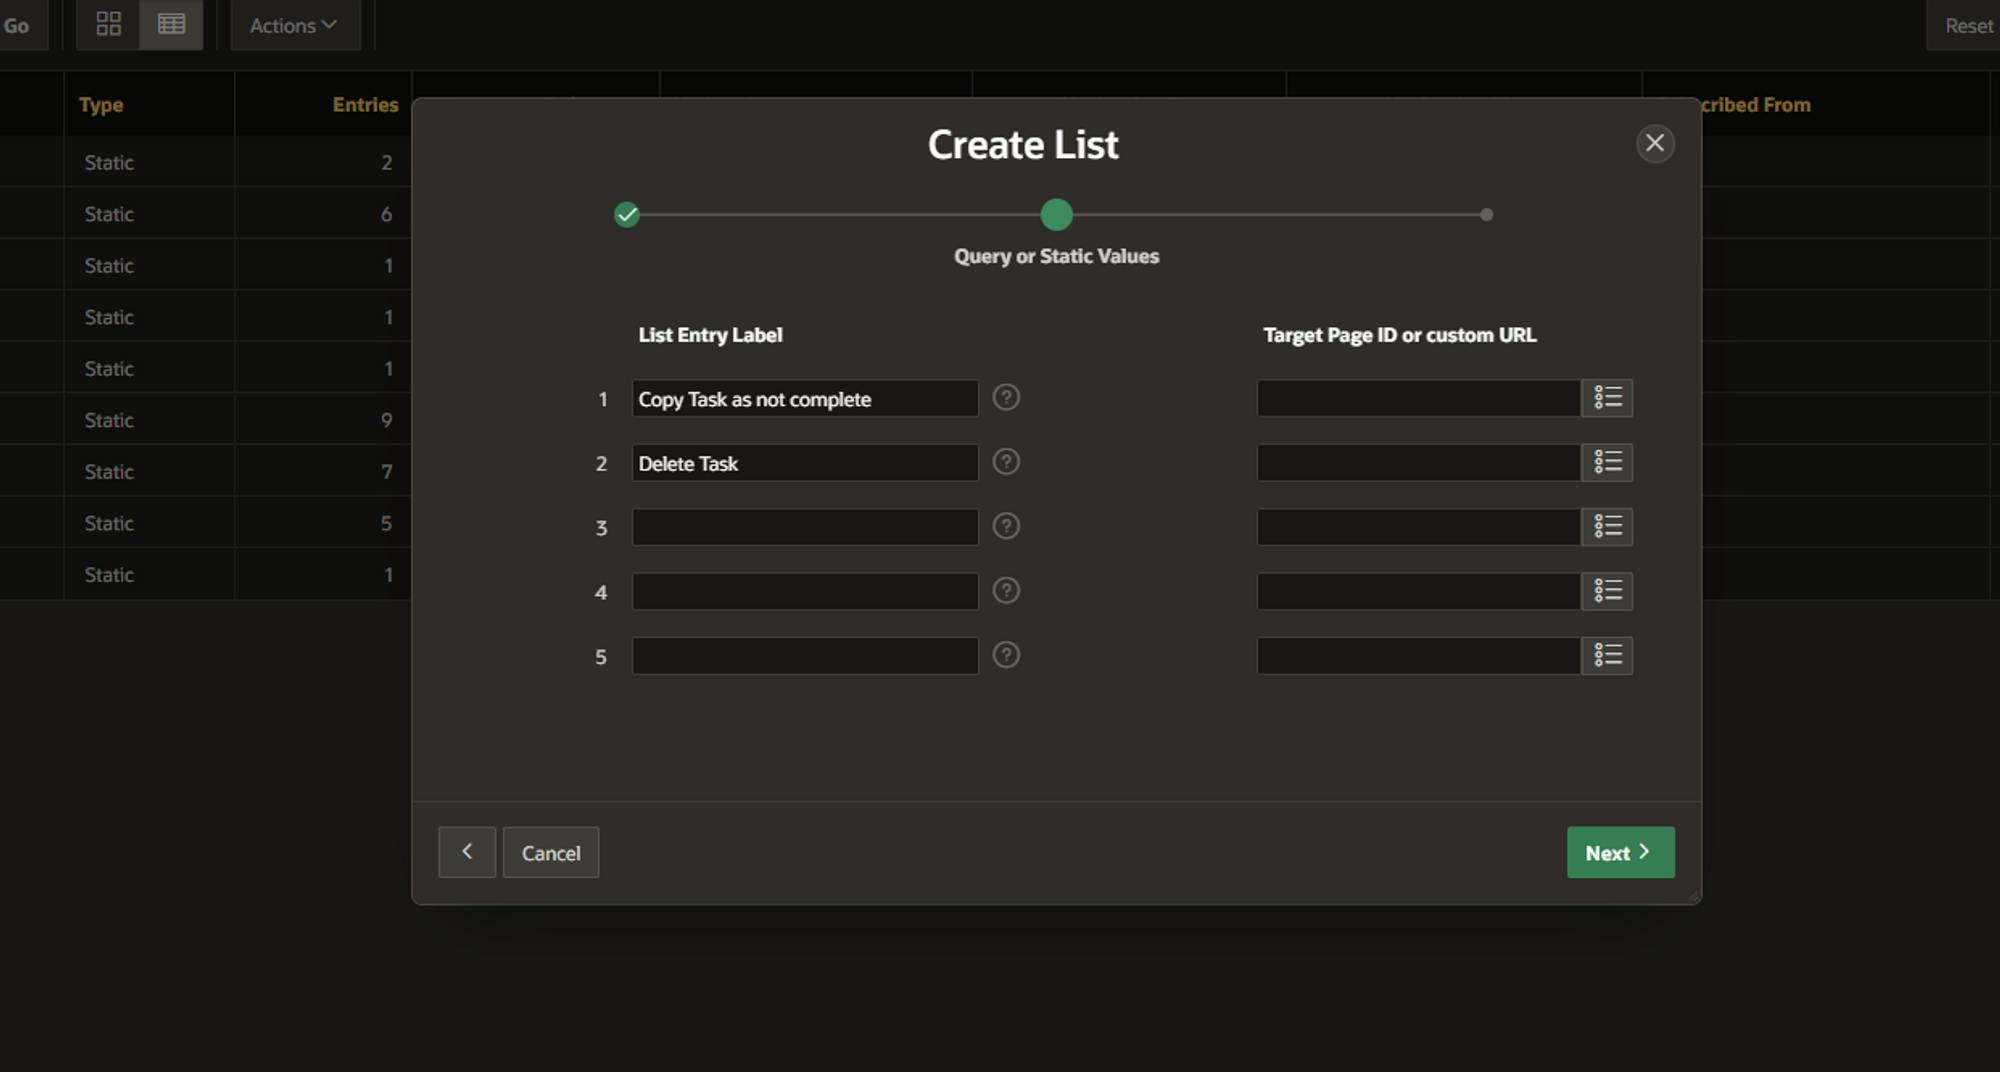
Define a name for your list. In my demo, I will be using 'Tasks Report Options.' After that, create the list entries for each action that you are going to perform on the page.
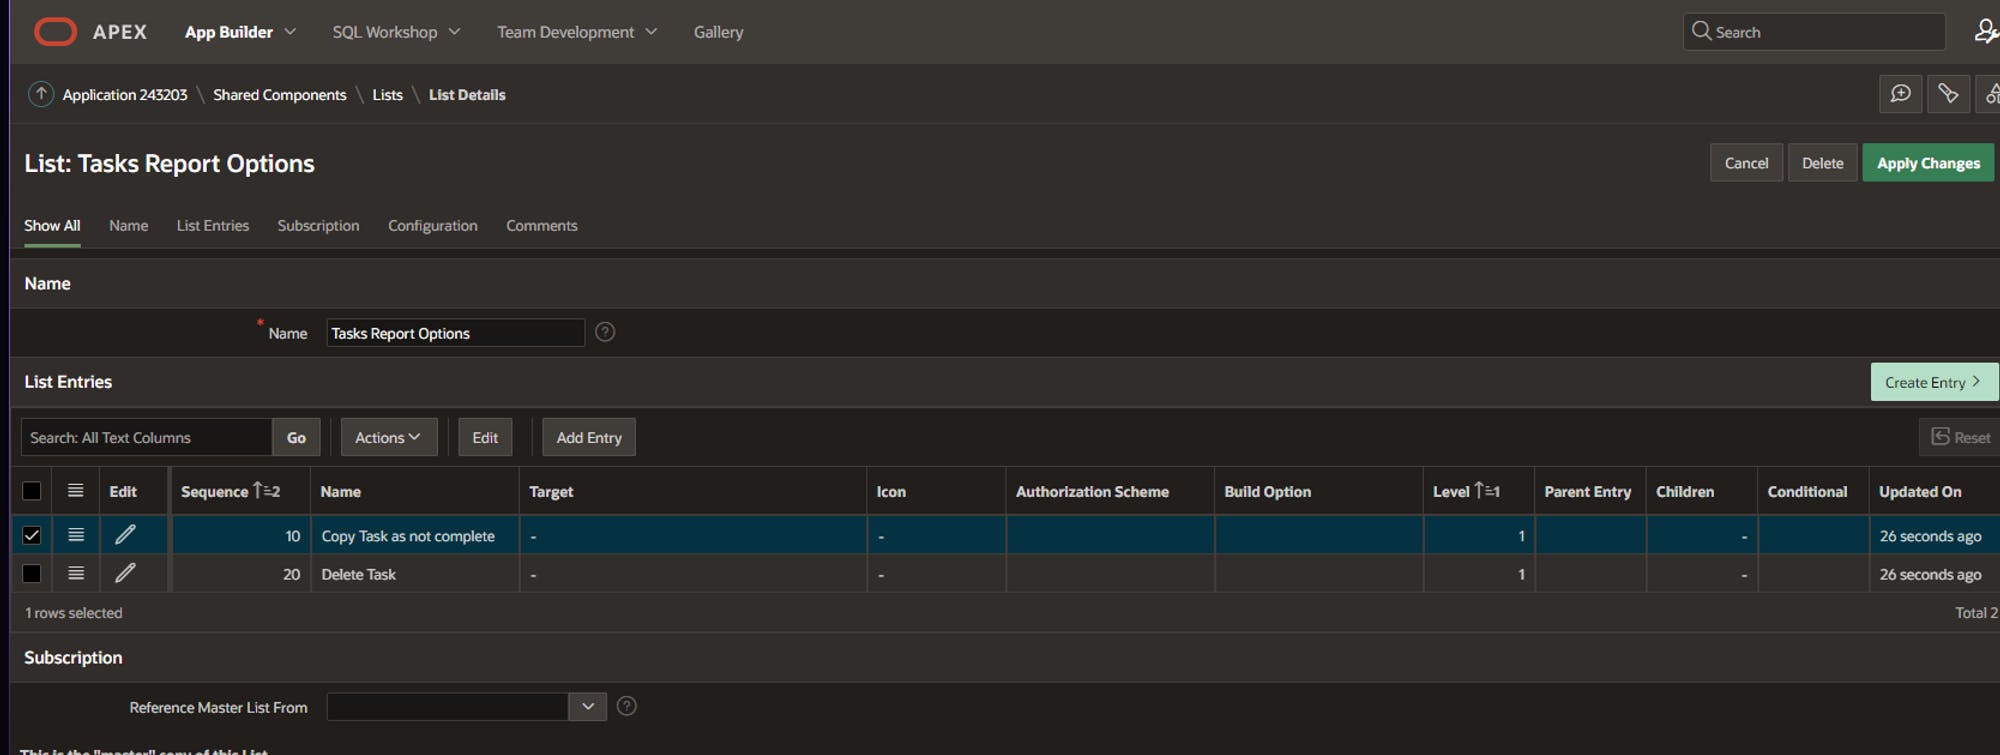
After creating the list, click on it, and in the grid shown below, click on the 'Edit' column to edit the entry.
In the 'Entry Definitions,' you can change the exhibition label of the option and configure a URL redirection. However, we will use this functionality to trigger a 'Custom Action' on our page. In my case, the action will copy the selected task and insert it into the database as a 'Not Completed' task.

- Explanation of the code inside the 'URL Target' Property

                                        //must be inside single quote
javascript:apex.event.trigger(document, 'menuAction',{action: 'copyTask'});
- Assing all the list entries with the code, changing only the '
action' value

Setting up the page
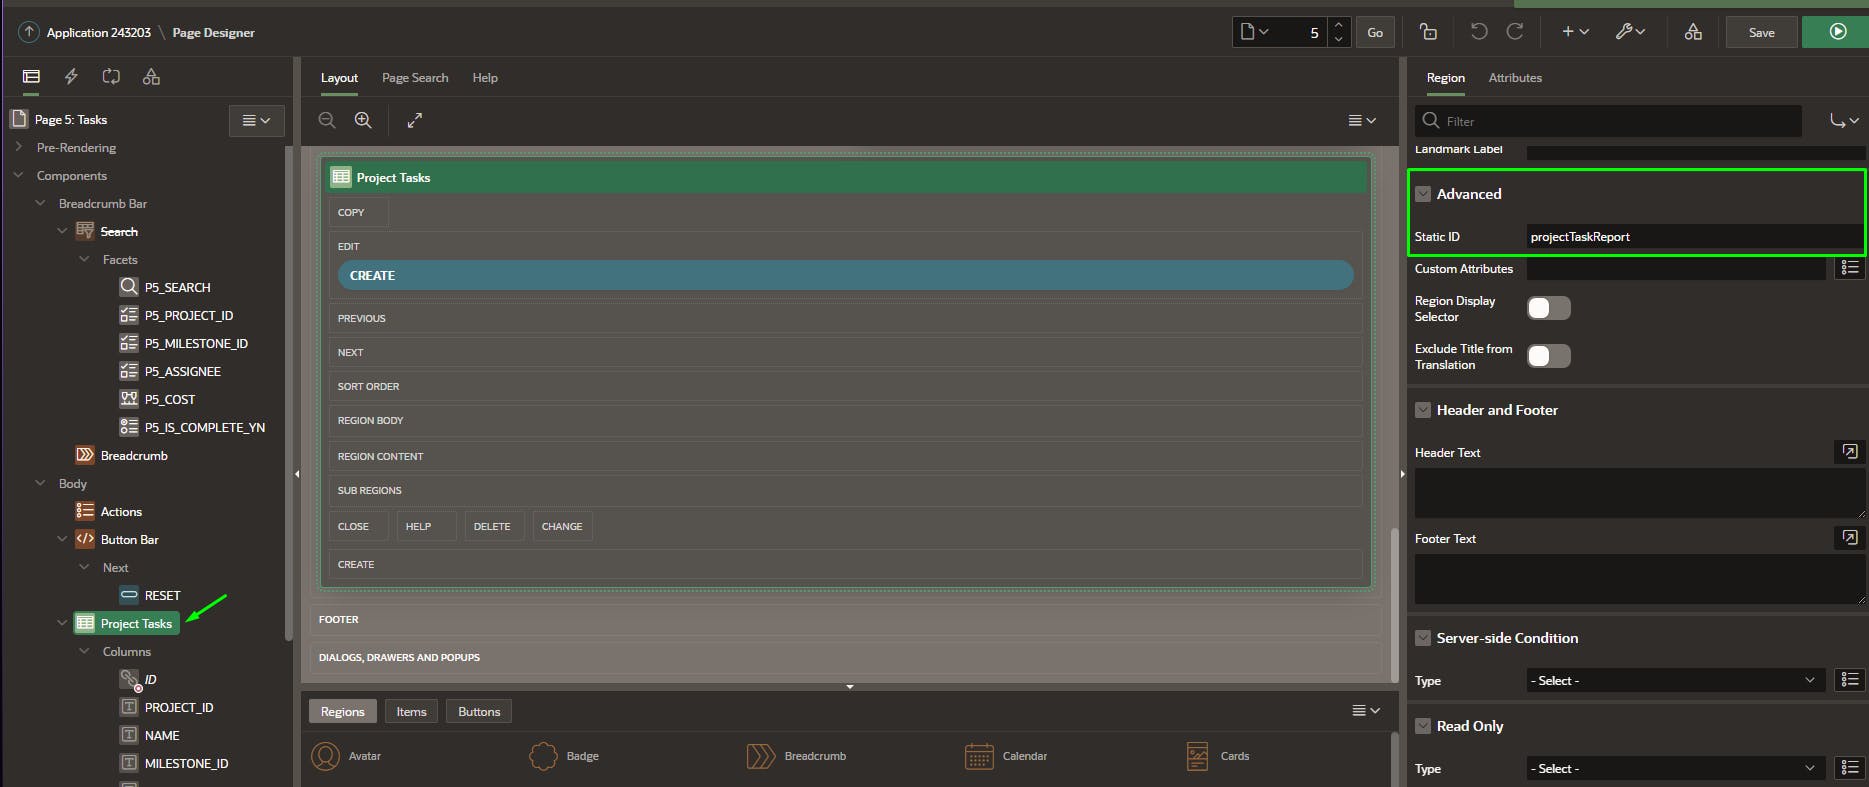
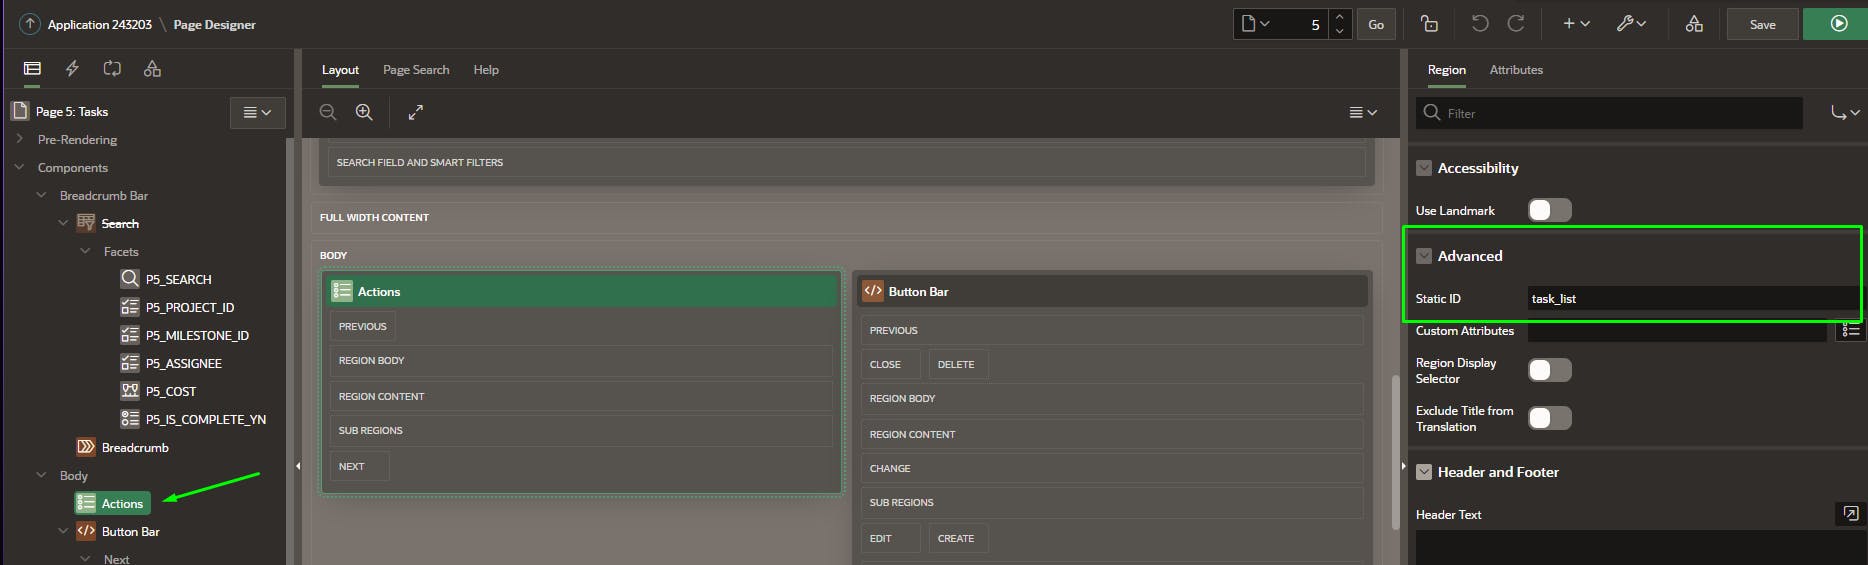
On the page where your report is, assign a static ID for the region of the report
Now, let's create a new List Region

Set the source of the region the list we created earlier
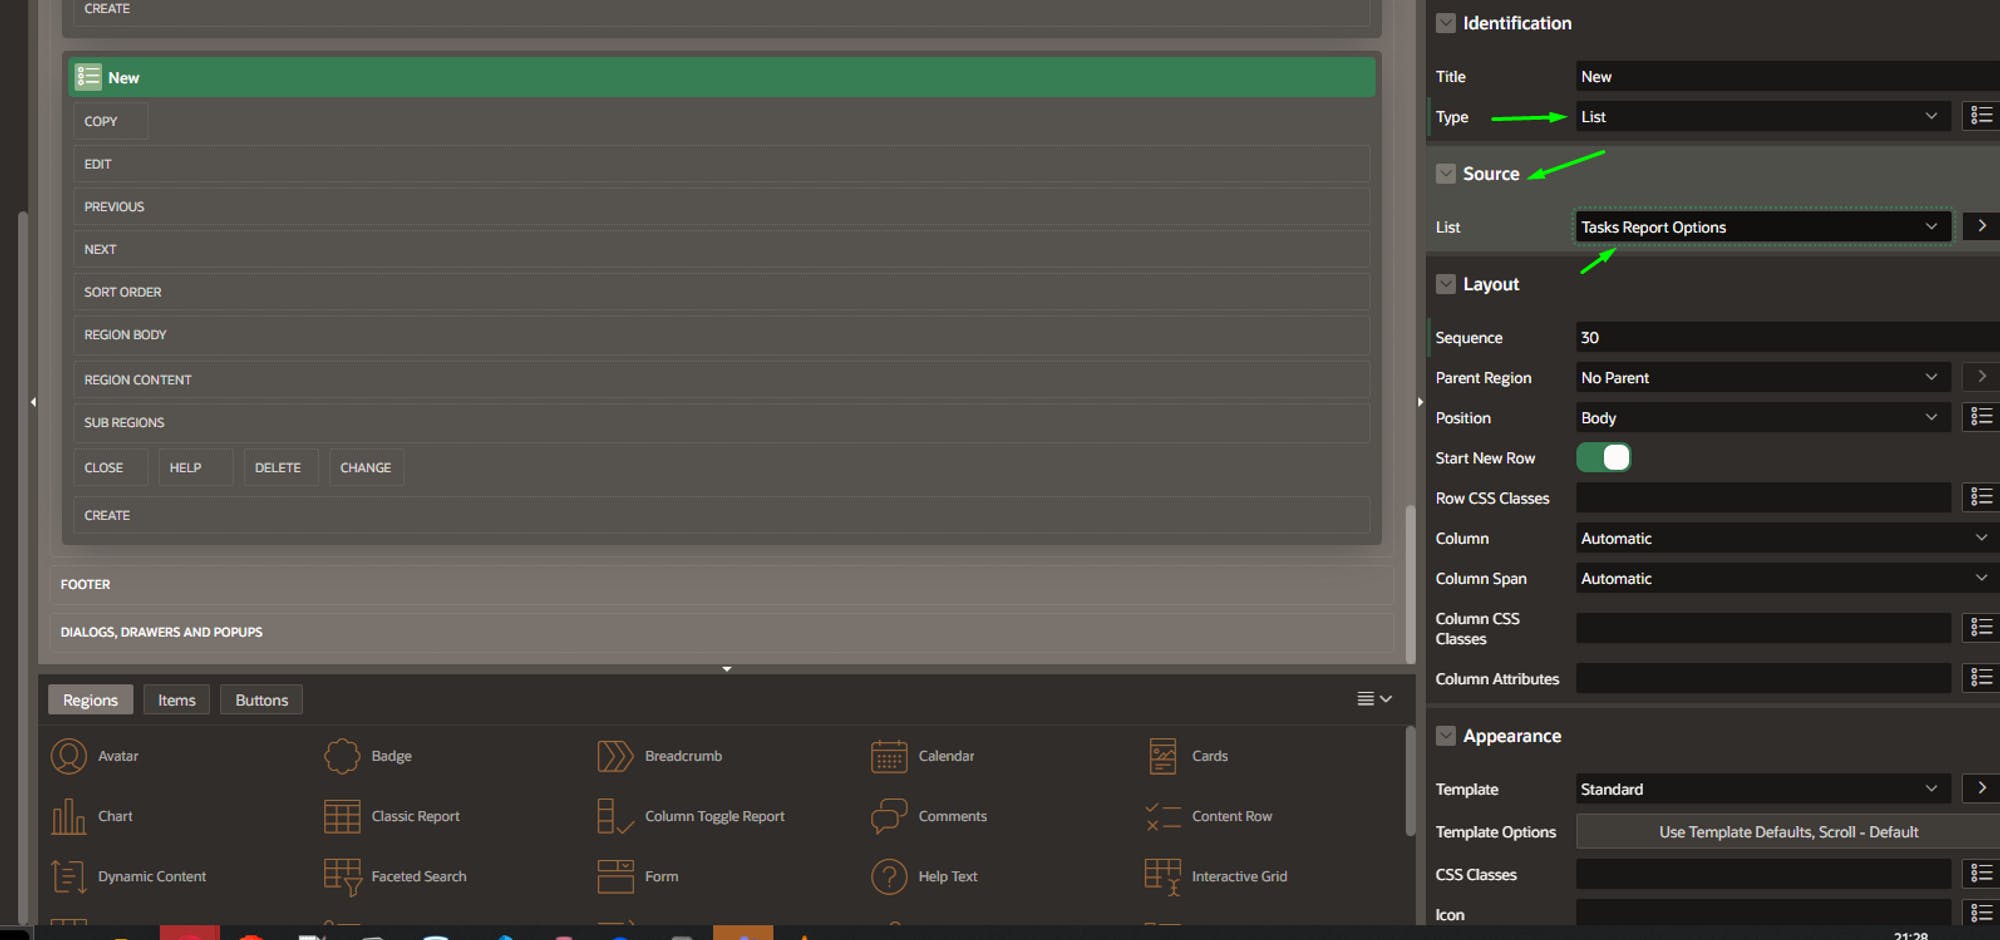
Define a Static ID for this region too
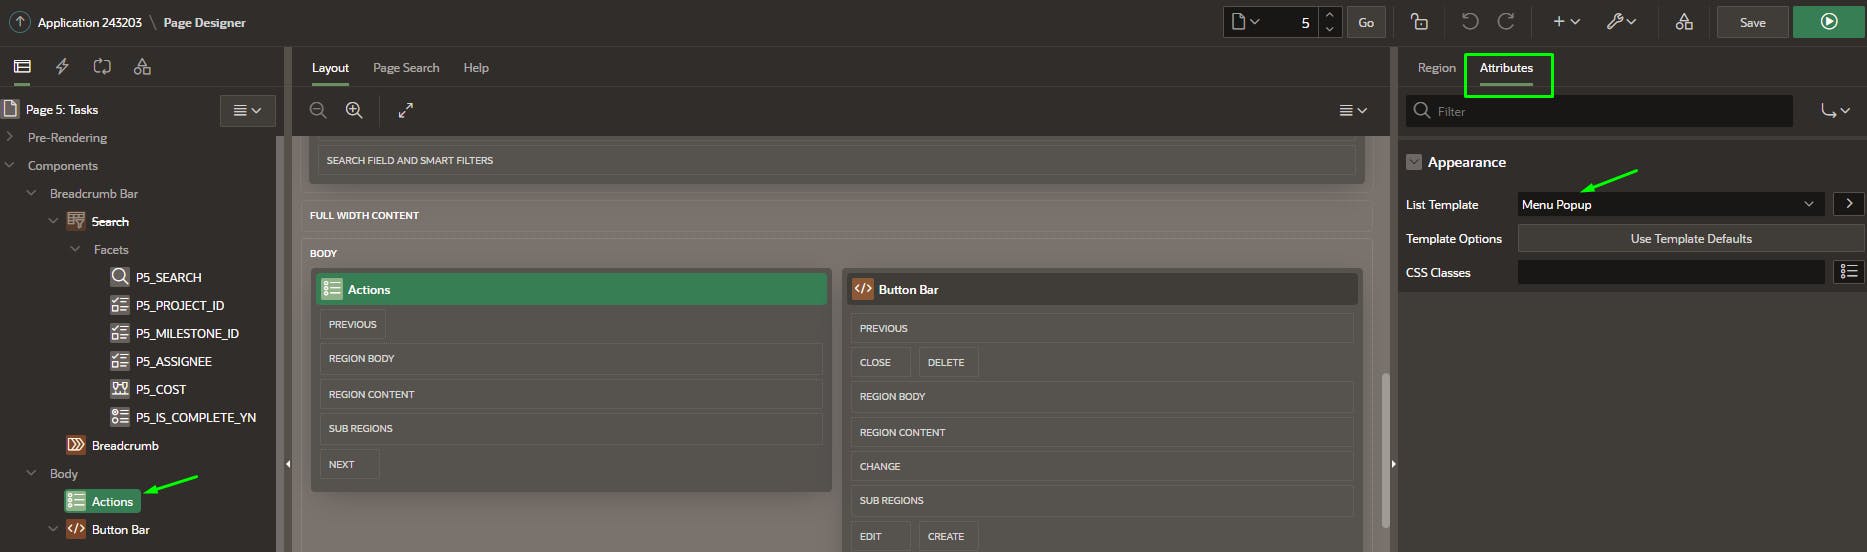
In the 'Attributes' tab of the region, select 'Menu Popup' template
We finished the list configuration. Now, let's make the 'Action' menu column
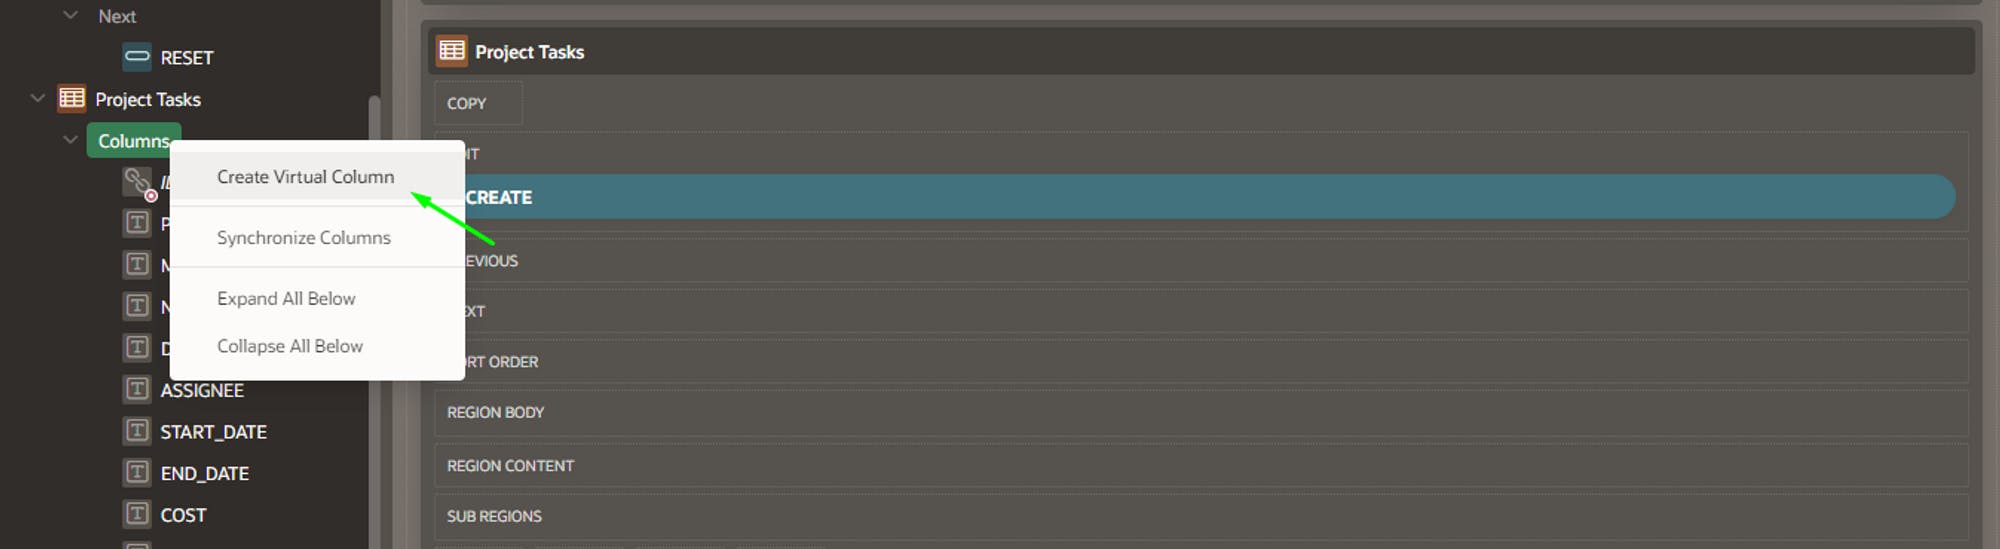
Select your report and create a new column that will receive the drop-down menu. You can create it by editing the Source (SQL) property of the region, but for my demo, I will be creating a virtual column
Inside column properties, select 'Plain Text' as the type. This action will reveal the 'HTML expression' property under the 'Column Formatting' property group. Optionally, you can assign
 to the 'Heading' property to hide the column heading.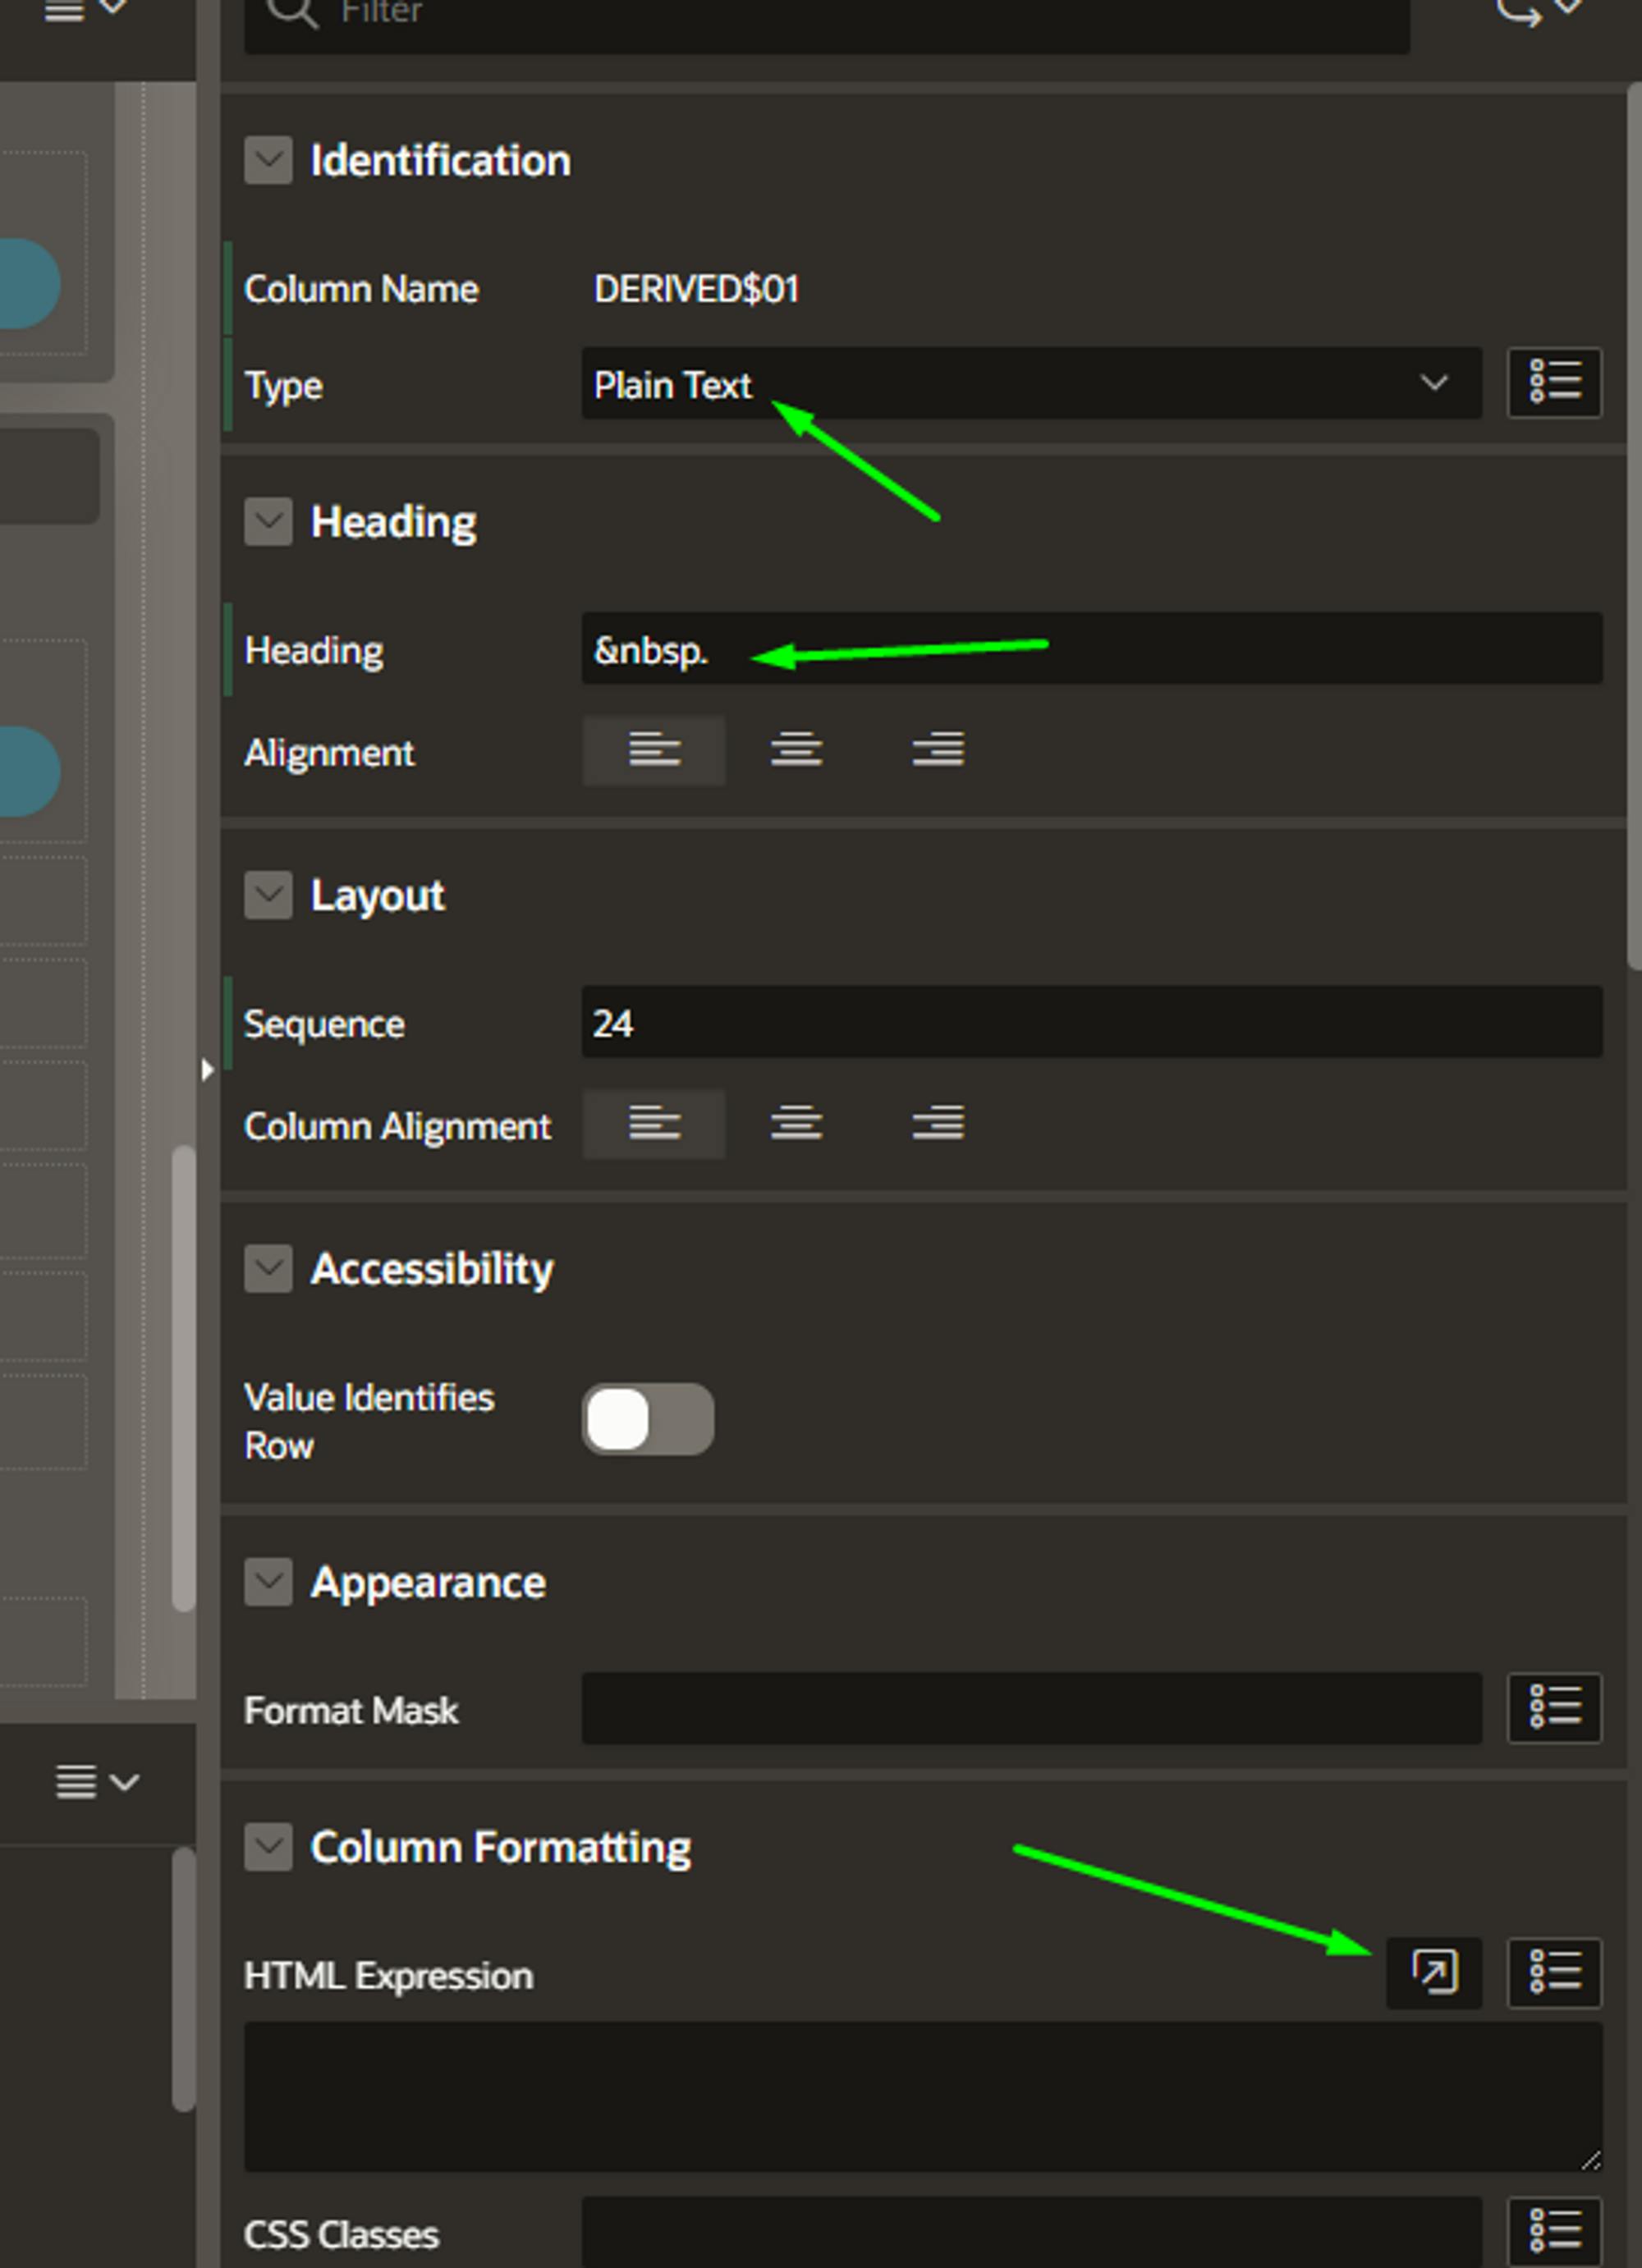
Within the 'HTML Expression' property, insert the following code:
<button class="t-Button t-Button--icon t-Button--iconRight js-menuButton"
                data-menu="#LIST_REGION_ID#_menu"
                type="button"
                 aria-expanded="false"
                data-id="#PK_OF_THE_ROW#"
                data-information="#MORE_INFORMATION_THAT_MAY_BE_USEFUL#"
                data-ig-region-id="#ID_OF_THE_REPORT_REGION#">
<span class="t-Icon t-Icon--left fa fa-check-circle" aria-hidden="true"></span>
<span class="t-Button-label">Actions</span>
<span class="t-Icon t-Icon--right fa fa-chevron-down" aria-hidden="true"></span>
This will build the Action button with the native CSS classes, giving it a native appearance as well.
For your purposes, replace the values inside
##as needed.Note: For
data-menuproperty you must keep_menuafter inserting your list region id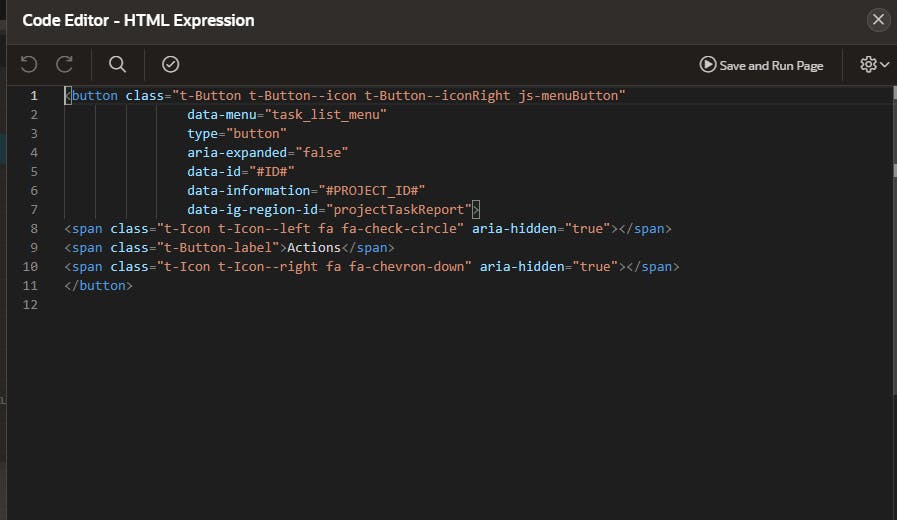
Now, let's bind our button to trigger a function every time the user clicks on it. This way, we can assign a global variable with the data that we will use for the selected action in the drop-down
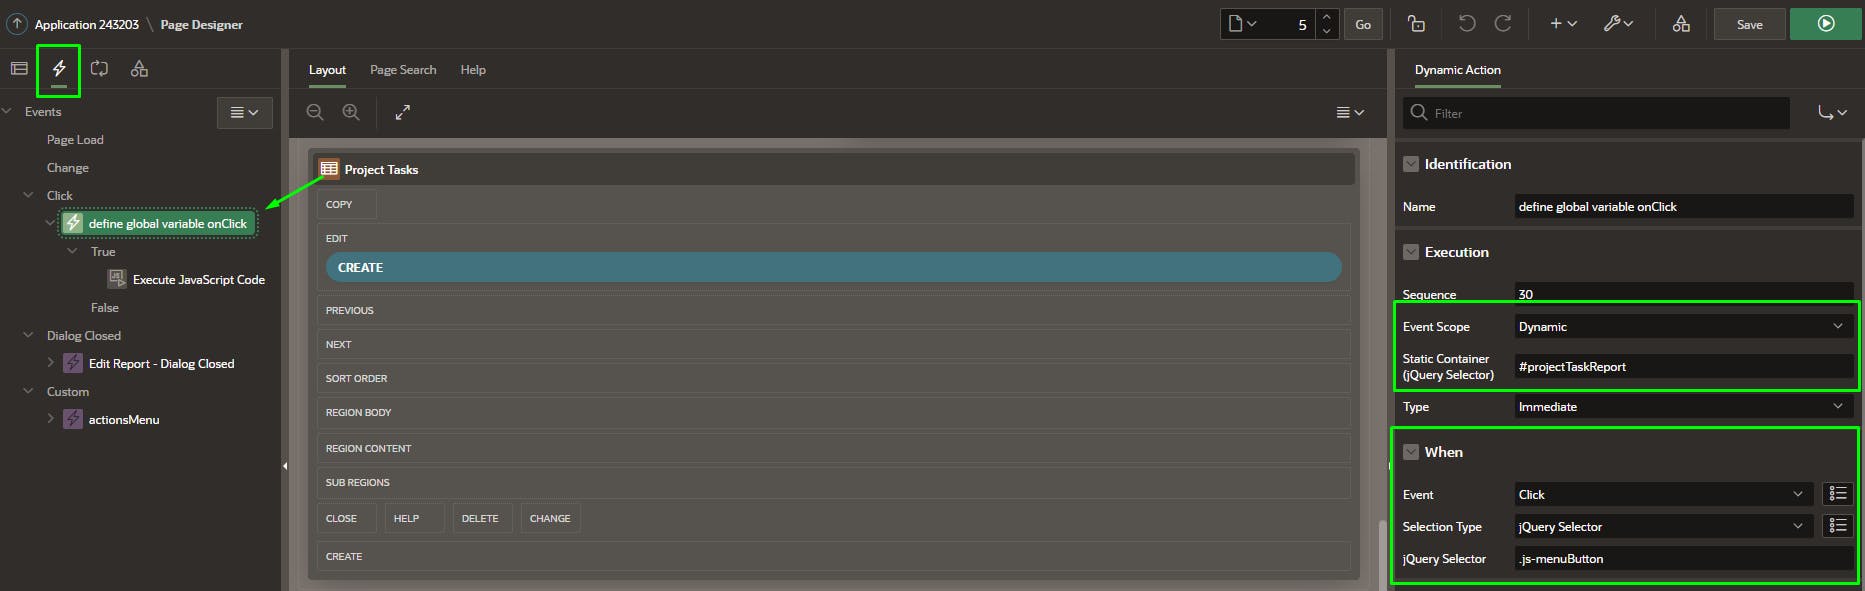
For this, navigate to the Dynamic Actions tab and create a new dynamic action with the following properties:
Event Scope => Dynamic
Static Container (jQuery Selector) => #yourReportRegionStaticId
Event => Click
Selection Type => jQuery Selector
jQuery Selector => .js-menuButton (Or any class that you provided in the HTML for the button)
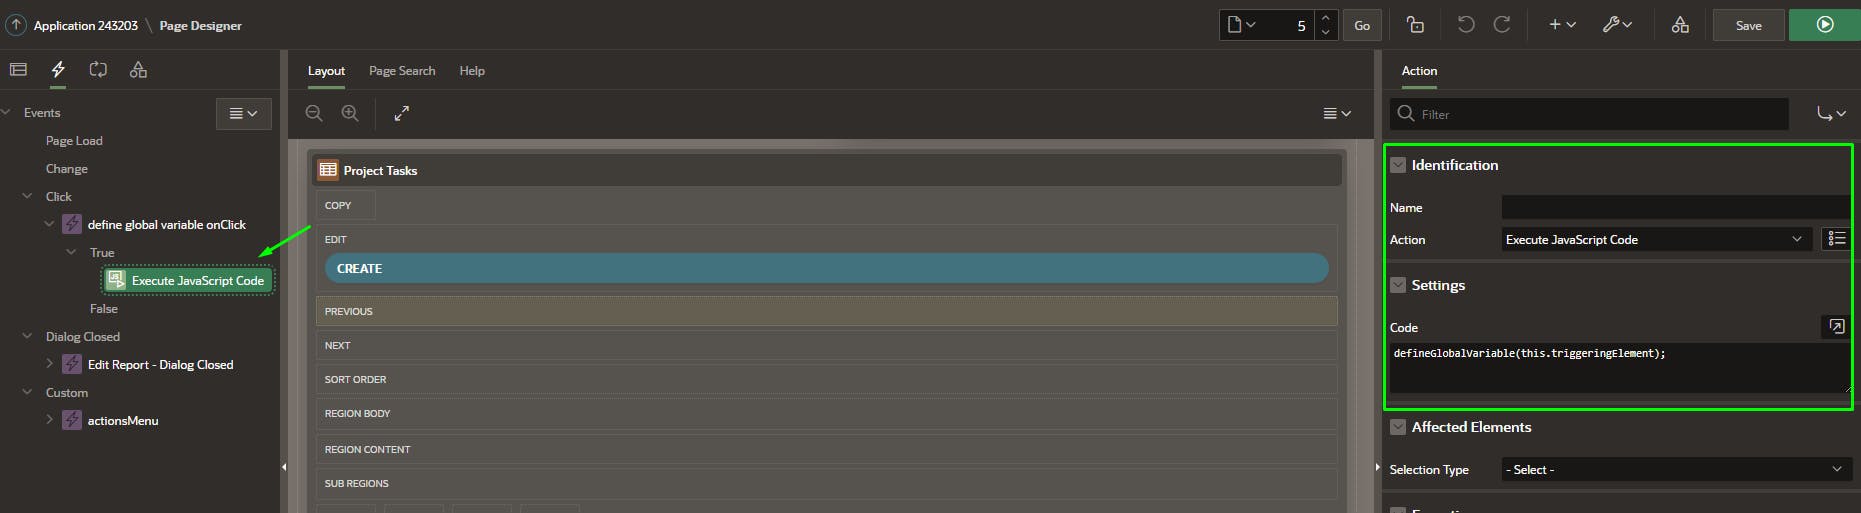
Create a new true action with the following properties:
Action => Execute JavaScript code
Code =>
defineGlobalVariable(this.triggeringElement);(Or any other functions name that you want)
- Now, navigate to page properties and open the 'Function and Global Variable Declaration' section. Insert the following code:
var dataRowCalled = null;
//this way, we will have the data of the row inside in a global javascript variable
function defineGlobalVariable(buttonElement){
    dataRowCalled = buttonElement;
}
Navigate to Dynamic Actions again and create a new custom action with the following properties:
Event => Custom
Custom Event =>
menuActionSelection Type => JavaScript Expression
JavaScript Expression =>
document

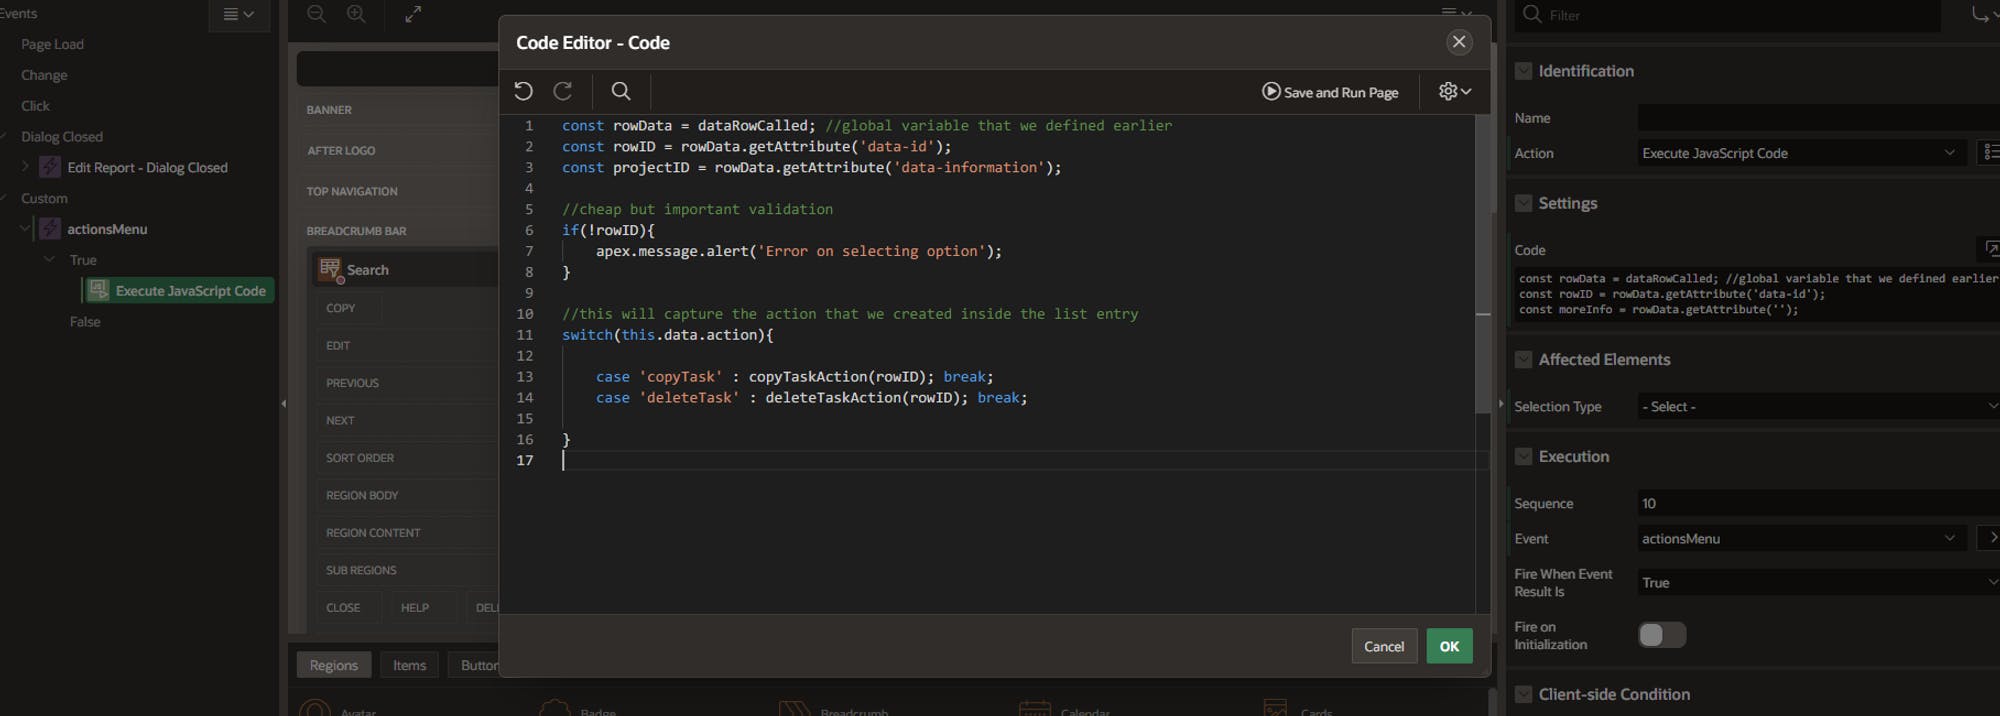
- Create a true action and for 'Action' select 'Execute JavaScript Code' and enter this code:
const rowData = dataRowCalled; //global variable that we defined earlier

//getting the data attributes from the button which contain the row ID
const rowID = rowData.getAttribute('data-id');
const projectID = rowData.getAttribute('data-information');

//cheap but important validation
if(!rowID){
    apex.message.alert( "Error on selecting option",null, {
    title: "An error ocurred",
    style: "warning",
    okLabel: "Ok"
} );

//for versions of APEX below 23.1 use this:
//apex.message.alert( "Error on selecting option");

}

/* this will capture the action that we created inside the list entry.
case #your_action_defined_in_list# was selected on the drop-down menu, it will trigger the
yourCallbackFunction function, sending the row id as a parameter */
switch(this.data.action){
 case '#your_action_defined_in_list#' : yourCallbackFunction(rowID); break;
 case '#your_action_defined_in_list2#' : yourCallbackFunction2(rowID); break;
}
- For the demo:
It's time to create our callback functions which were passed as a parameter of the
caseNavigate to page properties and open the 'Function and Global Variable Declaration' section to build your callback function. For the sake of the demo, I have built this function
function copyTaskAction(rowID){

    //the that our callback will receive
    const processName = "COPY_TASK_ACTION"

    //passing the ID for my server-side code
    const dataSent = {x01: rowID};

    //function that will handle with the reponse if no call error happens
    const displaySuccessMsg = (response) => {
                                                //if the operation had success then 1
                                                if(response.status == 1)
                                                {
                                                //show success message and refresh the report
                                                apex.message.showPageSuccess(response.msg);
                                                apex.region("projectTaskReport").refresh();
                                                }else{
                                                    //show error message
                                                    apex.message.clearErrors();
                                                    apex.message.showErrors
                                                    ([
                                                        {
                                                            type:       "error",
                                                            location:   ["page"],
                                                            message:    response.msg,
                                                            unsafe:     false
                                                        }
                                                    ]);
                                                }

                                            }

    const callback = {success: displaySuccessMsg,
                      //function that will deal with the call errors
                      error: (a,b,c) => {console.log(a,b,c); apex.message.alert("Something went bad.")} }

   apex.server.process(processName, dataSent, callback);
}
- Now we can create the server-side callback. For my demo, I will copy the data from the specific row passed by parameter and insert it into the database as a new record.
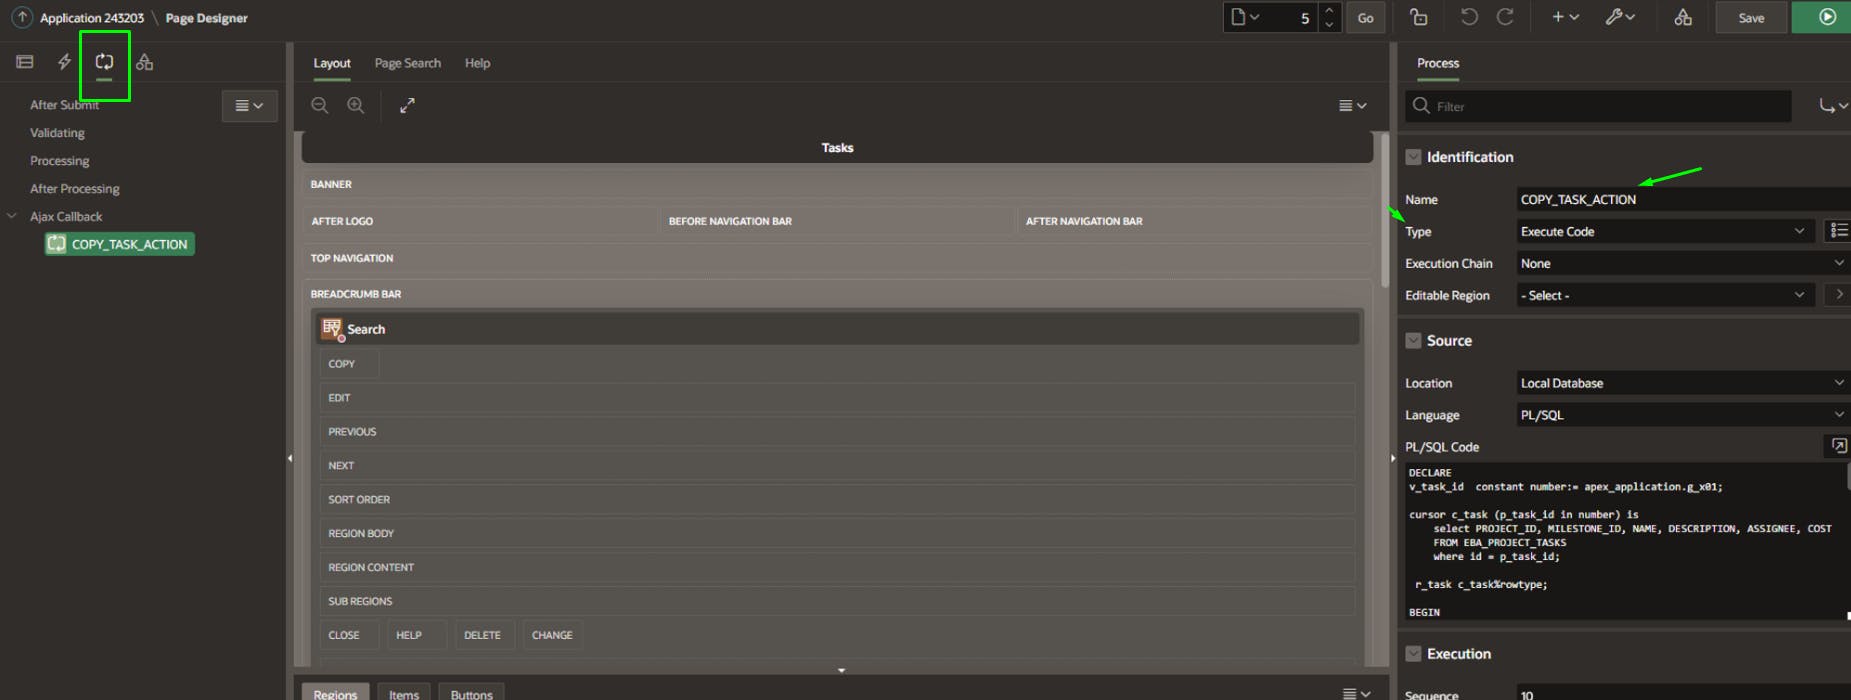
In the 'source' property, I inserted the following code
//source code
DECLARE
v_task_id constant number:= apex_application.g_x01;
cursor c_task (p_task_id in number) is
select PROJECT_ID, MILESTONE_ID, NAME, DESCRIPTION, ASSIGNEE, COST
FROM EBA_PROJECT_TASKS
where id = p_task_id;
r_task c_task%rowtype;
BEGIN
open c_task (v_task_id);
FETCH c_task INTO r_task;
INSERT INTO EBA_PROJECT_TASKS
(
PROJECT_ID,
MILESTONE_ID,
NAME,
DESCRIPTION,
ASSIGNEE,
COST,
START_DATE,
END_DATE,
IS_COMPLETE_YN,
CREATED,
CREATED_BY
) VALUES
(
r_task.PROJECT_ID,
r_task.MILESTONE_ID,
r_task.NAME,
r_task.DESCRIPTION,
r_task.ASSIGNEE,
r_task.COST,
SYSDATE,
SYSDATE+90,
'N',
SYSDATE,
:APP_USER
);
CLOSE c_task;
commit;
apex_json.open_object;
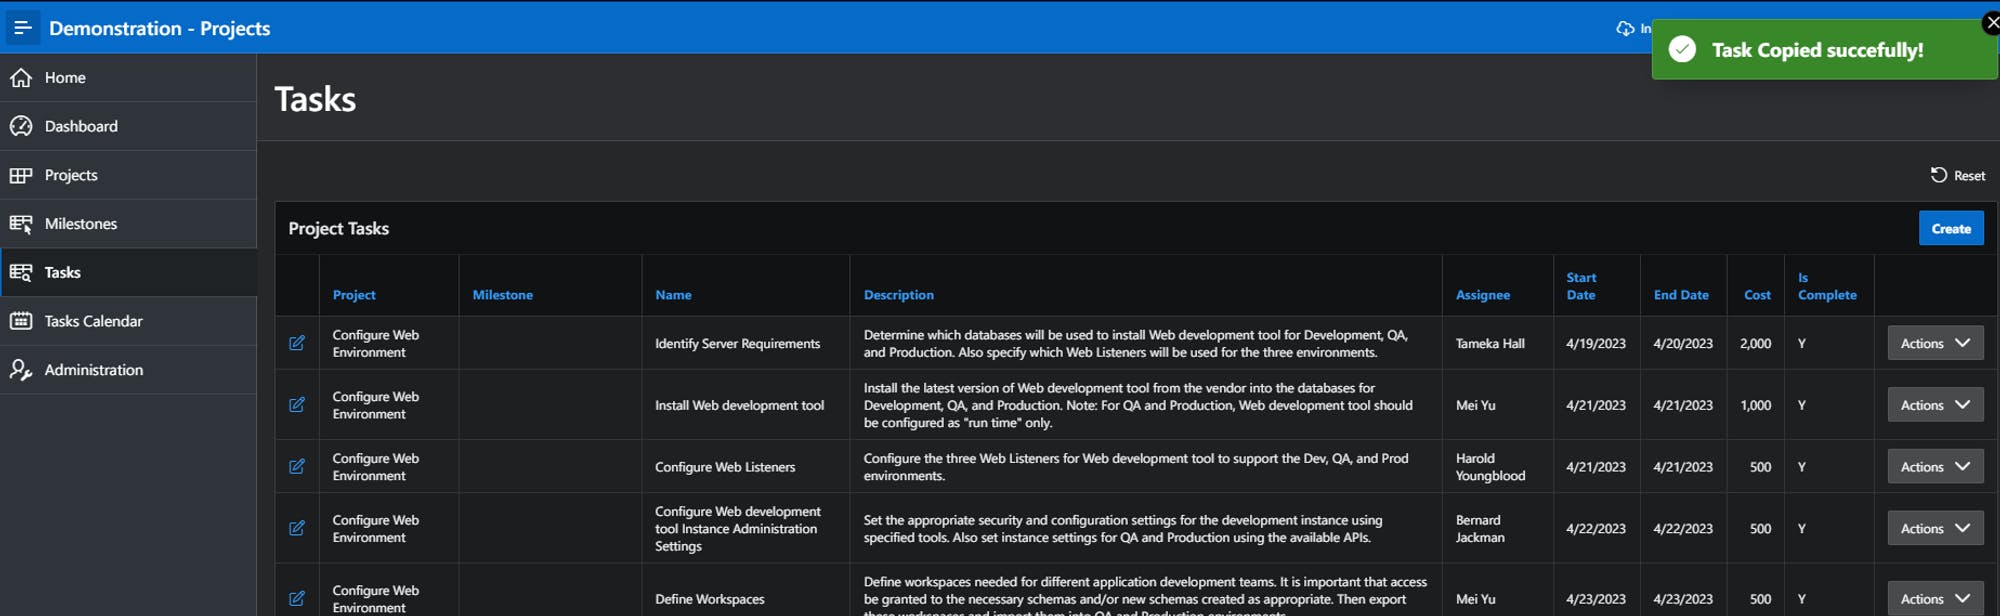
apex_json.write('status', 1);
apex_json.write('msg', 'Task Copied succefully!');
apex_json.close_all;
EXCEPTION WHEN OTHERS THEN
apex_json.open_object;
apex_json.write('status', 0);
apex_json.write('msg', 'Error on copy Task '||SQLERRM);
apex_json.close_all;
END;
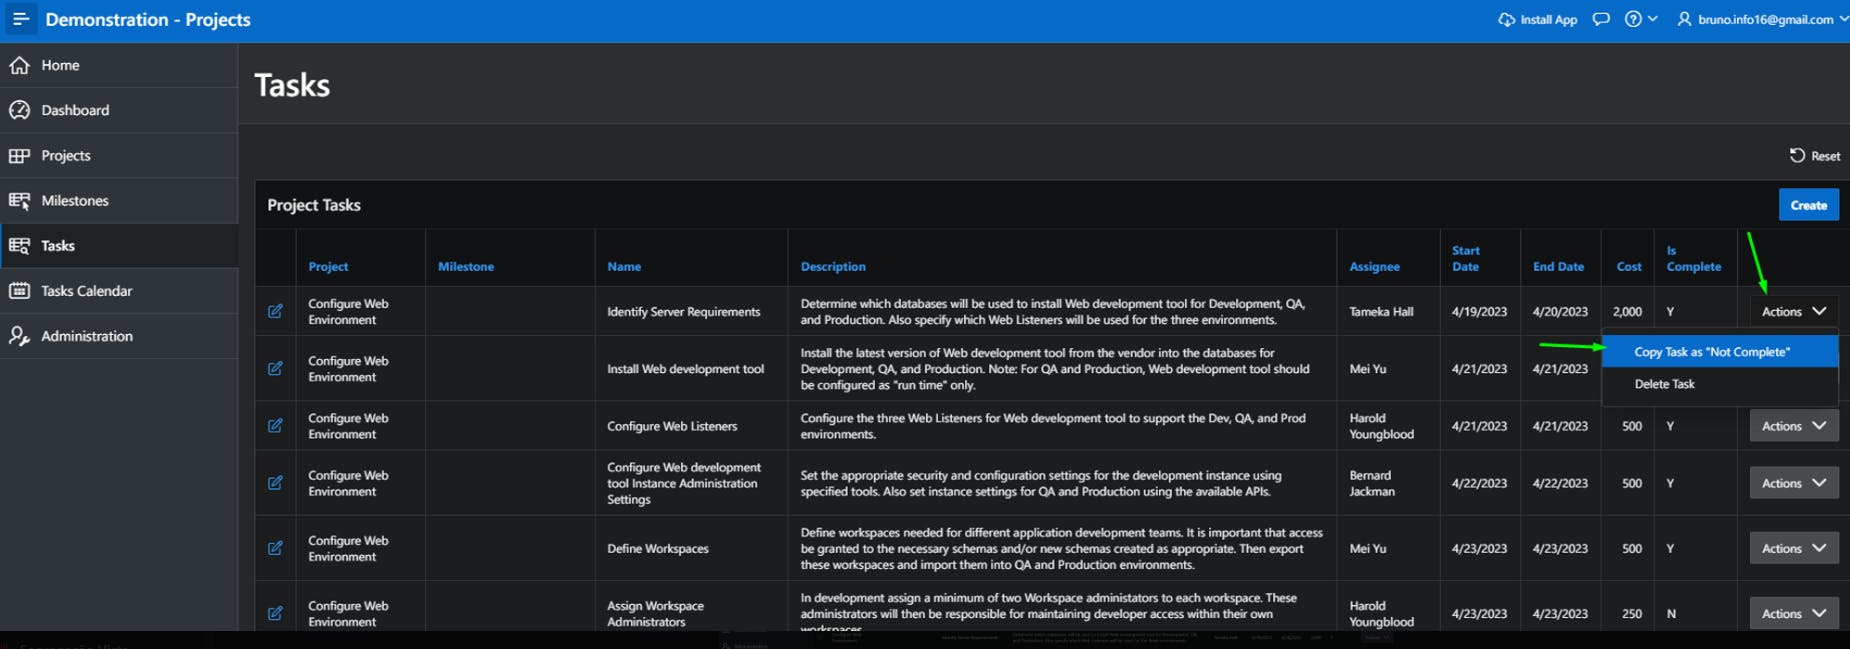
Phew, finally!
Now you can test the feature that we just implemented:
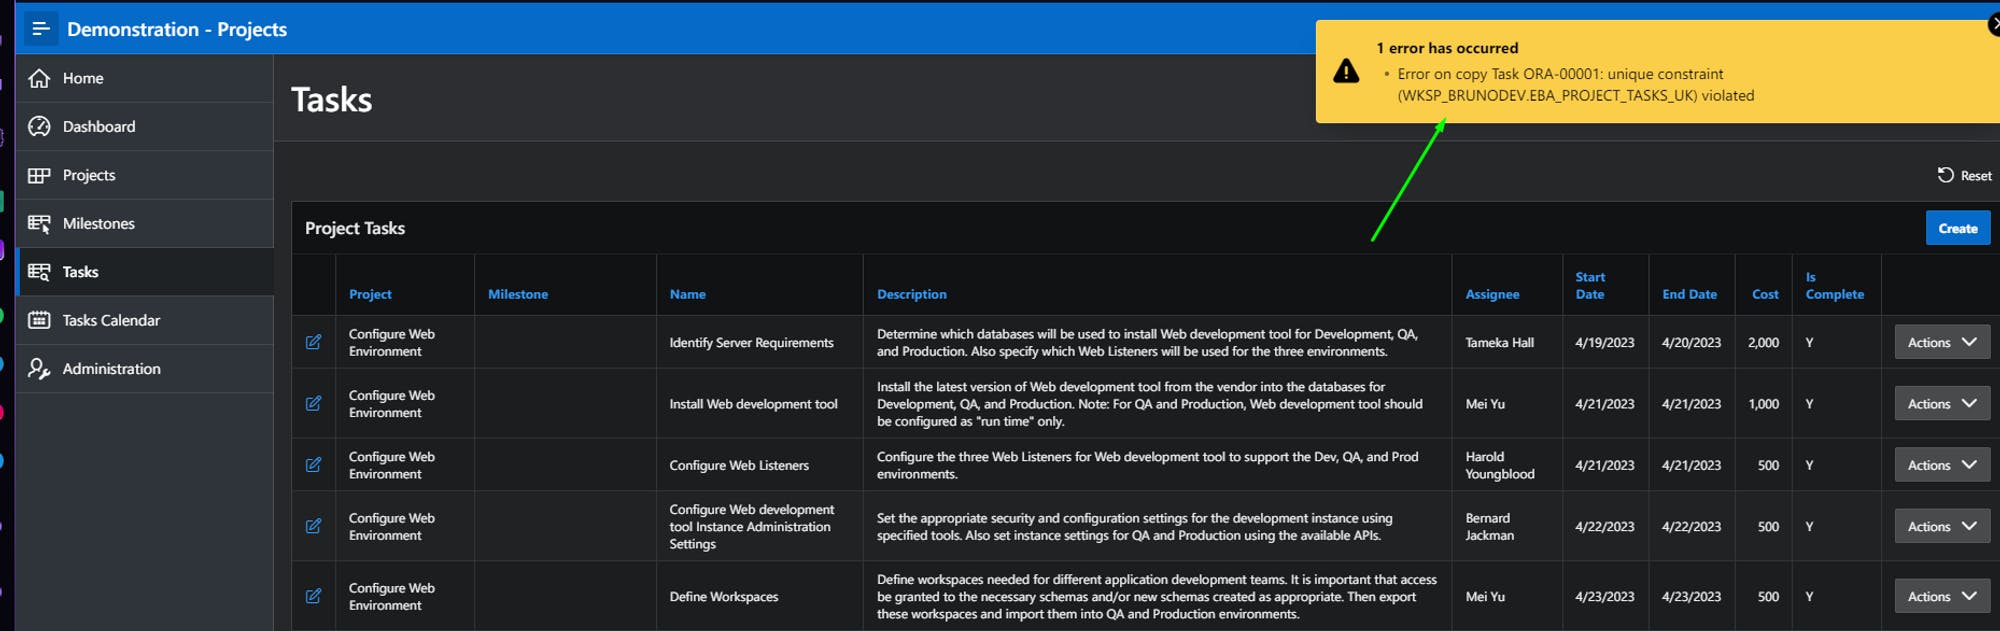
If an error occours:
If any error occours and the process had success:
That's all for today! Don't forget to like the article and subscribe to my newsletter if you've learned something useful. See ya!